

 |
First |  |
Previous |  |
Back to Index |  |
Next |  |
Last |
| 37 records found. Page 3 of 4 displayed. | |||||||||
For most of the photos on this page, you can click the image for a larger picture.
 |
Now we can tighten this bolt. I used a torque setting of 20Nm. |
 |
The lower fitting on the LH can be tightened. This was tightened to 40Nm. |
 |
Back to the front of the engine, attach the LH top bracket to the engine bar using the socket head bolt, lower arrow, Then fully tighten the top bolt - I used 40Nm. Finally tighten the socket head bolt. |
 |
Fit the plastic cover to the bolt. |
 |
Now go to the RH side and attach the engine bar to the frame as in the LH side procedure. This is how everything will line up around the footrest. |
 |
Make up the fixings. Plain washer and spring washer under the bolt heads. Spacers between the engine bars and the footrest assembly. Note item 12 in the instructions and where it goes. |
 |
Plastic cap on top bolt. |
 |
Same as the left hand side. Attach the bracket to the engine bars using the socket head bolts, then tighten the main engine frame bolt. Finally tighten the socket head bolt. Fitting the winglet on one side was a bit tricky as it was difficult to lever it up enough to get the top lugs to engage - the engine bars are in the way. Take your time and it will go in eventually. |
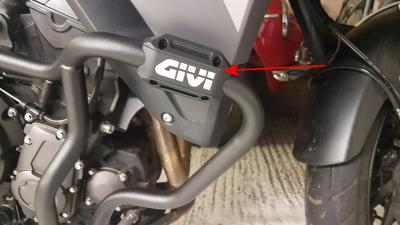 |
Finally fit the Givi advertising. I guess that these are mainly to protect the areas most likely to get caught on something. Job done! Postscript : the silver GIVI writing quickly vanishes! |
 |
2024 Update My latest bike is a 2024 Triumph Tiger 900, the 2024 model which some seem to call the gen 2 model. I'm not sure that the Givi web site in August 2024 is listing the correct engine bar set. However I did manage to get the Givi engine bars TN6415 set to fit. The main difference is the exhaust shields from the radiator. This is where "design" gets in the way of simplicity and ease of access. I think the main change was to try to divert some of the hot air as you do notice that heat on a hot day. Before, it was simple - unscrew one bolt on the extension plate at the bottom of the shield and you had access to the front engine bolts. Now you need to remove 4 bits of plastic on each side. This picture was taken after the bars had been fitted. First you need to remove the black plastic bit with "Tiger" on it. The front point is just hooked over the underlying plastic. The rear is secured by 2 plastic push rivets. |
|
First | |
Previous | |
Back to Index | |
Next | |
Last |
| 37 records found. Page 3 of 4 displayed. | |||||||||