 |
First |  |
Previous |  |
Back to Index |  |
Next |  |
Last |
| 56 records found. Page 5 of 6 displayed. | |||||||||
For most of the photos on this page, you can click the image for a larger picture.
 |
24 July 2014 So back we went, this time working on both sides at once. You can see how quickly the wood weathers in the sunshine. At this stage, I'll sing the praises of my DeWalt battery drill. It had already had a hard life before this job but performed faultlessly in spite of all the work it was called on to do. |
 |
27 July 2014 Once all of the roof boarding was in place, plastic sheeting had to be fixed to the roof. This wasn't very easy as you couldn't walk on the plastic and it was quite heavy. I fixed it in place with a staple gun working from the top. The next stage was to fit 58mm * 58mm pressure treated rafters on top of the plastic. I measured one carefully against the purlins and then jig pre drilled all of the screw holes on the rest of the rafters so that the rafters could be screwed through the T & G through to the purlins. I haven't spotted any screws where I missed the purlin! Once the bottom of the rafter had been fixed from the ladder, I could walk up the rafters to screw the rest down. |
 |
29 July 2014 The other side was a bit more difficult as it was a long way up from the field although the slope was shallower. Here, John our farmer neighbour was helping us out after a hard day wrapping sheep fleeces. |
 |
5 August 2014 August and it's time to take a week off to do the roof. I always wanted to do a roof; having done one, never again! The horizontal battens are only fitted on a temporary basis as something to stand on. I decided that it was going to be a lot easier with scaffolding in place. Unfortunately, the summer wasn't quiet for scaffolding firms and I had to try a few before I got one. For this week, we were joined by our other nephews, Matthew and William. All of the rafters are in place. A special machined piece of timber had to be fixed along the edge of the T & G boarding so that the fascia boards could be fixed to these. This was a bit fiddly and it was difficult to get it vertical. It could have done with a really straight line being cut along the boarding. This was a bit difficult. It was surprising to find out how waterproof the shed was when it rained. Only a few drips came in where the staples went through the plastic |
 |
6 August 2014 The first stage was to get a production line going in the shed and start to cut the Kingspan insulation to size. Then the insulation was packed down between the rafters. With that in place, the membrane was stapled down to the rafters, Following that, the endless task of screwing down battens began. The battens came from Jewsons and were utterly dreadful. Knots everywhere and shaped like spaghetti. Next time I would definitely buy my own battens and get good quality. They caused endless grief with nailing down the slates. I've got the first set of slates down to see what they looked like. I cut them in half using a rotary tile cutter with a water bath. It did the job nicely although you did end up with a very hairy burr! This could be removed with a Stanley knife. I used copper nails to fix the slates down. We started by hammering them down but the combination of 2 layers of slate plus endless knots in the battens caused a lot of bent nails and a lot of hammering. In the end we worked in pairs with one predrilling the slate and batten while the other hammered in the nails afterwards. |
 |
7 August 2014 Once the smaller side had been done it was time to start on the vast acres of the larger side. This seemed to go on for ever. |
 |
9 August 2014 The smaller side is almost reaching completion. The far side of the roof required a lot of cutting in order to ensure that there was the right amount of vertical overlapping. This was very slow work. I found that I had to adjust the width of around 3 slates per row so as to get a reasonable amount of overlap. |
 |
11 August 2014 Here's a closer look at the slates. It's the regularity that's the give away. Cumbrian slates are normally fitted in random widths and diminishing courses. I could have done the latter but I was running out of patience at this time, plus it was hard work on the knees. |
 |
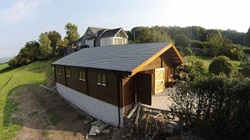
21 August 2014 The ridge was fitted by head torch just before the oncome of overnight rain. The ridge slates overlap each other by 50% so the only place you can see the screws is at one end. Even then you have to look very hard. One coat of walnut Osmo oil has already toned down the brightness and the second coat is giving a better colour. |
 |
21 August 2014 I got completely fed up walking up and down ladders to cut slates so I dragged the Workmate and the tile cutter up onto the scaffolding. That saved a lot of time. |
|
First | |
Previous | |
Back to Index | |
Next | |
Last |
| 56 records found. Page 5 of 6 displayed. | |||||||||