 |
First |  |
Previous |  |
Back to Index |  |
Next |  |
Last |
| 56 records found. Page 4 of 6 displayed. | |||||||||
For most of the photos on this page, you can click the image for a larger picture.
 |
17 July 2014 20:47 This is where we were at close of play on the first day of build. My problem with the windows hadn't emerged yet. |
 |
18 July 2014 11:00 We discovered the window problem this morning and lost a bit of time in resolving it. Here, the side walls are finished. We discovered 2 beams with another beam bolted to it in the package with not much clarity as to where they had to go. In the end we established that they were the intermediate beams spanning the larger room. Somewhat to my surprise these cross beams went in very easily. I had concerns that we would need a lot of pushing and shoving to get the slots to engage. Here's another of my gripes. The roof ridge timbers came partly fixed together in sections. You need to remove the temporary fixings to fit them. What I didn't spot and what wasn't in the instructions was that each truss had markings "1 of 4" or something like that to indicate each set they belonged in - the markings weren't obvious. It was one of things that you work out only when you've finished the job. As a consequence I've got slight ripples in the roof that irritate me every time I look at it. Instructions please! |
 |
18 July 2014 13:55 Time to fit the first purlin. It came in 2 sections with an overlapping joint. One of them covered 2 of the bays, the other the final bay. The purlins were from a lovely piece of timber. Although very unwieldy to handle (from a ladder) they went in reasonably easily. |
 |
19 July 2014 09:10 Almost there. Andrew had to leave for the airport in the afternoon so we wanted to get the walls finished before he left. John, our neighbour, came and give us a hand for fitting the high purlins. |
 |
19 July 2014 10:33 One more purlin section to go. The middle piece of timber to the left of the ladder closest to the camera had a bad warp. It's a pity I didn't spot it and fit it lower down as it caused a minor problem with the ridge. We had very few bits of warped timber. Most of them were persuaded into place with a large sash cramp and a Birmingham spanner. |
 |
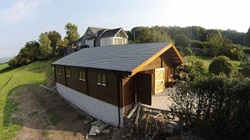
19 July 2014 11:33 And stage 1 complete! I reckon we did pretty well. 2 and a half days to get to this stage was pretty good going, I reckon. The next stages were a lot more fiddly and took a lot longer |
 |
19 July 2014 11:24 And a view from the field. It was a bit bright at this point in time; we decided that it would need to be toned down a bit. |
 |
20 July 2014 From now on, the instructions were silent apart from some short comments in an email. The next stage was to fit tongue and groove boarding to the purlins. The slope on this side was just a bit too steep for comfort. The old caving harness and jumar came in useful to stop me falling off the roof. Tools went in the bucket. This was one of those steady jobs - you didn't make fast progress like putting up the walls |
 |
20 July 2014 4 hours to get here. It was round about here I had a sneaking suspicion. |
 |
20 July 2014 The tongue and groove came in 3 lengths. On one side you needed 1 length, on the other side 2. I'd started by fitting the T & G that gave, what seemed to me, a reasonable overhang. I was wrong! The ones nearest the camera are the ones I should have fitted. Nothing in the instructions about this although I suppose it was a bit of a basic mistake. I had toyed with the idea of buying or hiring a nailing gun. In the end I decided to screw everything down. Fortunately that decision meant correcting this mistake was easy although it involved a lot of additional work. |
|
First | |
Previous | |
Back to Index | |
Next | |
Last |
| 56 records found. Page 4 of 6 displayed. | |||||||||