 |
First |  |
Previous |  |
Back to Index |  |
Next |  |
Last |
| 56 records found. Page 3 of 6 displayed. | |||||||||
For most of the photos on this page, you can click the image for a larger picture.
 |
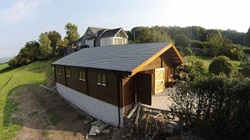
3 July 2014 The ground prepared for the entrance ramp. I wanted a grid drain across the front of the shed so that any water driven in by the westerly wind would go down the drain and not under the door (hindsight - some hope!). The sunny weather deserted us for a while. |
 |
12 July 2014 The drains are laid. The first 2 deliveries from Keops have arrived. First a set of battens from Jewsons - more on those later. Second a delivery of Kingspan insulation for the roof. |
 |
14 July 2014 Another load of concrete for the entrance ramp. |
 |
16 July 2014 The big day! This is Robin who delivers for Keops and who is a master of his craft. Although there are 3 roads into the property; only one of those can take an articulated lorry of that size and that way in is a bit tight. Fortunately there is a turning area close to the house and Robin just managed to get the artic in there. Here unloading has started. |
 |
16 July 2014 Here's the set of purlins, half of which are over 8 metres long. A major problem emerged shortly after this in that there was so much stuff that there wasn't much room to unpack it. The weather didn't help as after a glorious spring and early summer it decided to rain this night. The guidance on the Keops web site says "Unwrap the parts of the pack, then group and stack them in piles of similar pieces. " I just didn't have room for that, especially when trying to keep them dry. It would have been good if the packages had been labelled. Even better if all of the bottom parts were in package so you only had to open one package at a time. If all of the roof trusses had been in one package, we could have put that to one side. The packaging itself was excellent and everything was in good order. However the documentation for the 4 ridge walls was non existent. I didn't realise that they had been broken up into 2 or 3 sections and that the sections needed to be put back as the same group. I have a little wrinkle in the roof to remind me every time I look at it. As Robin was about to leave, he got a phone call and then a gloomy face. He told me that the pressure treated sole plates were still at Keops HQ. They could deliver them next week. I had booked leave, our nephew from Northern Ireland was coming to help me and he was arriving that night. Fortunately we have a pressure treated timber merchant very close; Keops agreed that I should buy the timber from them and they would refund me. I couldn't get the exact size required but got some suitable timber. |
 |
17 July 2014 07:51 This is where I had a serious attack of the wobbles. I looked at this massive pile of timber and panicked. I thought I had bitten off far too much and considered booking the Keops installation team. However, we must persevere! You see that the rain hasn't helped as we are trying to keep the timber off the ground. We had to unpack things so that we could get access to the pieces that would be the bottom of the walls. With an interlocking timber system like this, all the walls must go up at the same rate. The really hard part at this stage was finding the right piece. For the walls we were given excellent plans which showed exactly where each piece of wood was to go. However, you had to find and measure the piece of wood to find it. The plans were pretty good although there were a couple of places that were not clear. One of them was a strange number on the plan for 2 spare pieces. Also we had 2 beams with parallel beams bolted to them. It wasn't obvious where they went. It was a bit of a worry because if you find late in the build that they went somewhere at the bottom, that would really made your day! Andrew came over specially to help us and we were very grateful for his help. |
 |
17 July 2014 10:53 A hot day and it got hotter. The good old trusty B&D Workmate earns its keep yet again. First a roll of DPC went down on the foundation walls then the pressure treated sole plates. Once that was down we could start building the shed. The long walls started with a full height beam, the short walls started with a half height beam. Here we're probably struggling to find the right piece of timber. There's no fixings, you just interlock it all together. I'd bought some rubber mallets but they were absolutely useless. The best tool was a big lump hammer. Fortunately Keops had supplied a good number of tongue and groove knocking blocks that you could put between the timber and the lump hammer. By the time the shed was built we had destroyed every one of them. The shed was pretty tight on the base. If I was doing it again, I'm not sure what the best policy is. If you make the base bigger than the shed, then you have the possibility of water pooling on the base and working its way under the soleplate. |
 |
17 July 2014 12:55 2 hours later, going up and getting hotter. |
 |
17 July 2014 17:29 So windows start to go in and we hit a major problem. Here was the first example of the poor quality of the instructions from Keops. The windows just drop into the free space between beams and and are not fixed in any way. They have a clearance space at the top that is hidden within the window channel. This is to allow the building to grow and shrink as the amount of moisture in the wood varies. I had studied the videos on the Keops web site and the instruction pamphlet that came with the materials. They were quite clear. You needed to remove a 65mm rebate on the log under the window. So some work with the circular saw to try to cut out a horizontal line. Fortunately, I made a tidy job of cutting them out and kept the pieces of wood. Unfortunately, I'd ordered the premium windows that didn't need the rebate and my folly only became apparent when we came to fit the beam at the top of the window where there was a 65mm hole! Better instructions are needed here. I had to glue the piece of wood I'd cut out from the bottom to the beam above it so that there was the necessary clearance between the top of the window and the beam and the big gap was filled. Another area where the Keops instructions were rubbish emerged when I found 8 pieces of timber around 3m long and 16 bolts. Eventually I deduced that these pieces of timber go either side of the stub walls on the inside. The intention is to stop the wall bowing. My feeling that the best time to have fitted them was probably at this stage, i.e. before the ridge trusses are fitted. With the roof on, there was no chance of straightening out the slight bow that I was left with. Nothing in the instructions about this. |
 |
17 July 2014 18:08 A lovely summers evening. You can see that we've found some timbers on the wrong side of the wall. |
|
First | |
Previous | |
Back to Index | |
Next | |
Last |
| 56 records found. Page 3 of 6 displayed. | |||||||||